Another year, another module. This term of the module, Virtual Environments will be focusing on 3D models again using 3D Studio max. This semester contains two of the following: A 3D of my face for the first 5 months and a group work based on The Museum of Power for the rest of this semester.
My first thought for this module was we are creating a 3D enviroment but never realised that we begin by creating a 3D model of our faces. At first I thought this is going to a challenging task but also very interesting task because I also wonder how do gamers, developers do that?!
I am looking forward to seeing the final results of my 3D face, it will be alot of hard work for in these couple of weeks.
Tutorial 1:
The very first attempt to create a 3D face of myself, I needed to provide two photos. A front-view and a sideview photo. They will need to be uploaded onto the computer so that I can work on the structure of my face on Photoshop.

The first step is to crop the spaces so that we can get a full view of the face. The next step is to check whether parts of the face is lined properly because it will cause problems when we start modelling the face in 3D. Looking at the face, I've noticed it was not balanced correctly and so I go to Filter, Distort and Lens Correction to straighten the balance.

We want to back the face slightly because it did look too close and so adjusting the Remove Distortion to +41.00, so that it looks flat. I've then tilted the frame to adjust its Vertical Perspective so that it balances just right.

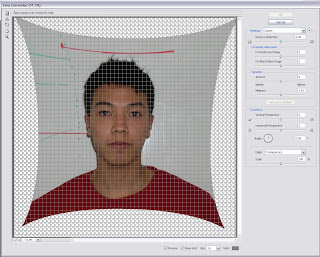
I select the side view then copy and paste it onto the front view and then change the opacity about 68% so that we can see if all the joints are lined together.

Merging the side view on the right, I've used the ruler to double check that both faces are level.


Next, I need to draw the Topology around the the joints of the muscles. These will take place when I start animating the face.

To get more sufficient with the face, I draw quads over the lines and outside so that it has flexibility on the muscles. I use the colour red for this.

You can see half of the face contains quads, thats because it needs to be perfect for the face to be animated such as the cheeks. It took longer to draw all the quads that is needed.

With the side view I plot guidelines to it.

Now I can finally start on the main development on 3D Studio Max. Watching the tutorial and taking notes, I find the process not difficult but easy and useful to follow.
I start with a plane then modify the Length and Width to 1 so we get a slim plane. Now I need the image of my face and so by opening the Material Editor and select bitmap. The image I will need is the Topology, so select that and drag it to the plane.

From the look of it, I have both faces but I need just one (front view). From the Modify list, the UVM Maping needs to be selected. Ticking the plus sign and highlighting the Gizmo tool , I can drag the front view side to the centre. Changing the Self-illumination to 100, I can now see the face when rotating as before it goes black.

Now I need the side view. To do this I select it and rotate while holding the shift button to 90 degrees. This will allow me to copy the face as shown underneath.

Now that I got another copy of the Topology, I repeat the same method as I did with the front view. The width of the face needs to be adjusted so that there no space remaining.

The last part of the process for now is to freeze the objects while we can still view the planes. By right-clicking and selecting Properties, the box Freeze needs to be ticked and the Frozen in Gray must be un-ticked.
