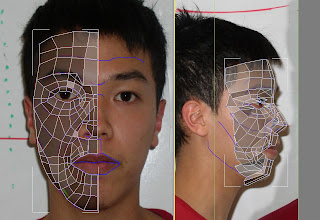
method to this, by selecting Symmetry it changes the face into a thin layer in the centre. If I flip it, the full face
appears. The face need to be adjusted again and so by selecting the + sign next to Symmetry, I click on Mirror
and then drag the other half of the Topology and form a whole face. This is where things became difficult, I have
tried to use Nurms Subdivision the surface but there were no effects to it, instead the quads started shaping
differently. I un-tick the Nurms Subdivision and tried to use vertex to remove the sharp edges. Due to the fact
that I was aware of the amount of time I have to complete the modelling. I have decided to continue to try and
mesh the surface. In the end it did not fully go as planned and now I have dents around the face. The nose was
a struggle as some of the quads I may have not included in the Topology. As the result I’ve decided to use
Vertex to add the structure of the nose. With the nostrils I have tried to follow the method, creating a
polygon and then extruding it but it did not occur as anywhere near as the example in the tutorials.

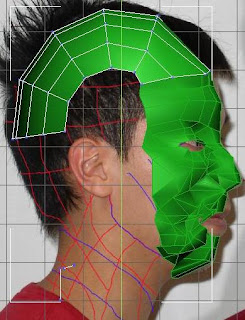
The next part is to create the back of the head. The simple step is to create a Sphere and place it behind the
model while scaling it so its size fit with the face. After that I cut out parts of the Geometry so that it joins and
lines up with the face and as you can see the screen dump below, the Geometry does not comply with the
rest by using the Edges, selecting some of the lines. Then I use Ring and Collapse to shorten the amount of
polygons because there is no need to have so many and that way it will be easier to add the rest of the
polygons.

Now that parts of the Geometry has been removed, I concentrate adding the required surface to the back of the
side, back of the head and also the neck.
As each week gradually moves on I feel my work hasn't progressed enough because of the amount of time spent
on meshing it.
By selecting the ends of each quads, I can drag and form another quad to make the process easier while
working downwards to the neck. Some became awkward and confusing once I have combined the face and the
back together because the polygons did not join correctly.

I need to get the other half if to get a full scale head and so by repeating the same previous method earlier from
I still cannot use Turbosmooth to get a smoothing edge for the back of the head. With the back of the head and
neck, I need to attach them onto the face. How I done it was I simply selected both the face and the back of the
head and clicked Attach.


which in result I've ended up creating alot of dents to it. If I was back in week 2, I could have re-started the
whole Topology again and getting the quads correctly without any possible errors where there seems to
be triangles appearing. I was unable to smooth the model and was gradually running out of time to start anywhere
near with the ear and getting to the stage to Unwrap the textures.
The most important task was to get the full head completed and so I feel pleased that I have done that stage
but overall still disappointed that I could not apply any textures because I want to see how my 3D model
would look like.

On week 3 our group organised to meet up and visit the Museum of Power in Langford to take
some photos and film a machine that we are going to create on 3Dsmax and animate it.
We've looked through every machine the museum has and we've decided that this machine is more
easier to see when we model it and we can see how certain parts operate and how each manoeuvres.
This is a photo that I took individually of the machine called Horizontal Compound Steam Engine.
I find this will be a very complexed task to create on 3Dsmax as 3D animation isn't my strongest
subject but we will see how the overall completion of the model will be in the final week.
So far no work has been done but our plan will be meeting up on week 6 and begin discussing each
member of the group who will be working on.